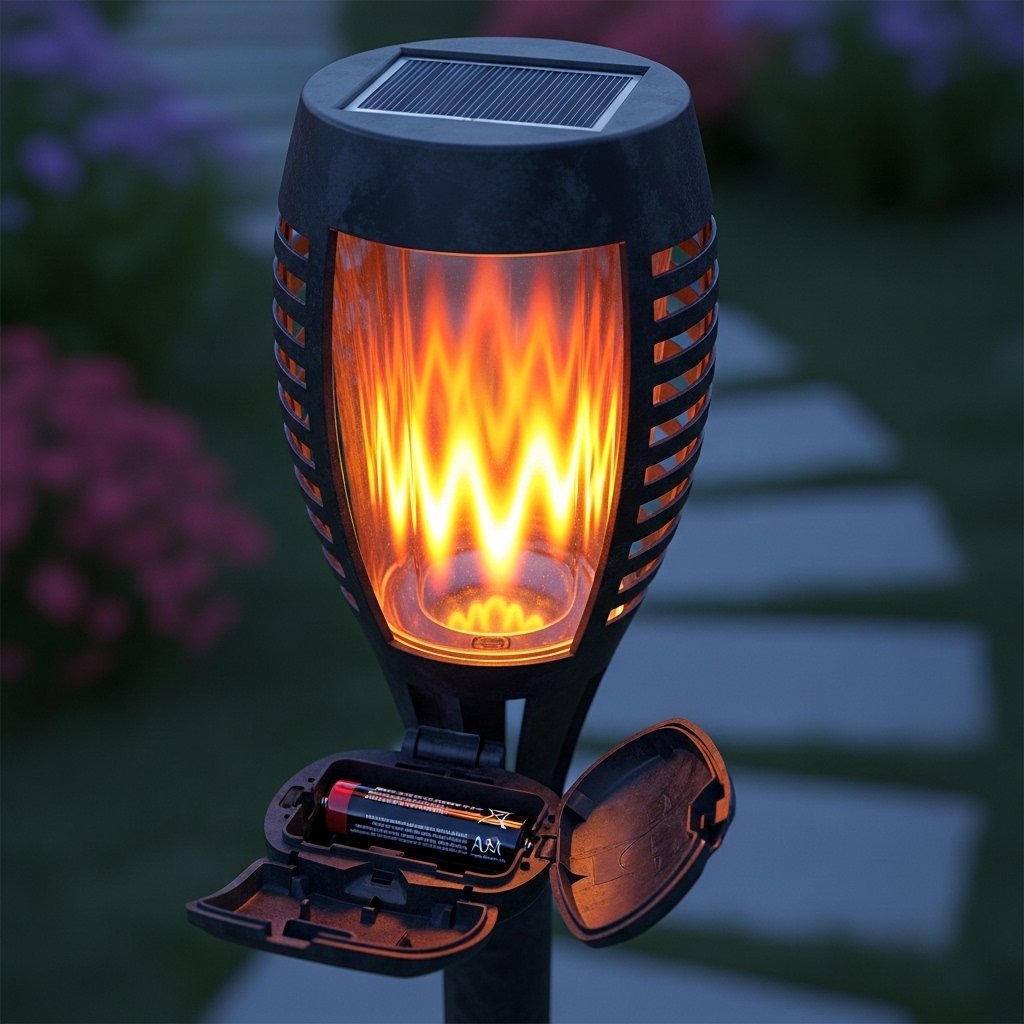
Every night, your patio was filled with a lovely, comfortable glow from your flickering flame solar light. It’s hardly a flicker now, perhaps none at all. Here’s some good news before you throw it away: the solution is most likely only a dead battery. It’s also easier to replace than you might imagine.
But here’s the problem. These lights are not often made with simple battery change in mind by the manufacturers. A basic screw compartment is found in some. Others conceal the battery deep within. You’re not alone if you’ve been wondering where the battery might be while looking at your light.
In this article, we will discuss the answer to how to open battery in flickering flame outdoor solar light, discuss two light types and guide you how to open both, step by step guide, which battery type you need, and tips to make your flickering flame light last longer.
So, how to open battery in flickering flame outdoor solar light?
You’ll need:
- Small Phillips head screwdriver
- Small flathead screwdriver or plastic pry tool (an old credit card works too)
- Clean, dry cloth
- Replacement batteries
- Small bowl or magnet to hold screws
Look at the bottom of your light. There’s a small door with screws which needs to be opened after you remove its screws to change the batteries. No door? Remove every screw you can find, gently pry the light open and the battery will be inside.
Identify Which Type of Light You Have
Identify the type of flickering flame light you have, before you begin twisting or unscrewing anything. You could break your light if you try the wrong technique.
Type A: The Easy Access Light
These lights have a visible battery compartment somewhere on the bottom or back. It’s usually a small rectangular or circular door held in place by one or two small screws. Sometimes it’s a clip-on cover with no screws at all. Standard rechargeable AA or AAA batteries are usually used for these lights.
Type B: The Hidden Battery Light
These lights have no visible battery compartment. No door. No screws that obviously lead to a battery. Usually placed below the LED plate or beneath the solar panel, the battery is concealed inside the main housing. Instead of using regular batteries, these lights often use a specialized Li-ion battery pack.
Take a good look at your light. Turn it over. Check the sides and bottom. You have Type A if you see a tiny door or panel. If all you see is smooth plastic, you probably have Type B.
How to Open Type A (Easy Access Battery Compartment)
If you found a visible battery door, you have the easier type. Here’s how to open it.
Step 1: Let it rest after turning off the light.
The light needs to be turned off through the switch which shows an “off” position.
Give it some time to sit. This enables the circuitry to release any remaining charge..
Step 2: Find the battery compartment.
You should check the light’s bottom part and its flame lens. The solar panel area contains a secret compartment which some lights use as their storage space.
Step 3: Remove the screws.
The compartment needs to be opened through screw removal which requires a Phillips head screwdriver.
A small bowl or magnet should be used to keep the screws secure because they will be lost if you do not use that method.
The tiny screws will become invisible when they contact the ground surface.
Step 4: Pry open the cover gently.
The cover requires more than screw removal to lift off because plastic clips keep it attached to the surface.
Using an old credit card or a plastic pry tool, the cover must be carefully removed.
Because using a metal screwdriver will produce scratches and break the clips, the plastic components will guard against damage.
Step 5: Note the battery orientation.
The old batteries need to be removed after you observe which direction they face.
The positive (+) and negative (-) ends matter.
Make a mental image or use your phone to take a photograph. The most frequent error is doing this incorrectly.
Step 6: Remove the old batteries.
Remove the old batteries. Put on gloves or give your hands a good wash if they have leaked green or white powder.
Step 7: Replace the old batteries.
The light requires NiMH (Nickel-Metal Hydride) batteries which should be used in their original AA and AAA dimensions.
The system prohibits alkaline battery usage because these batteries are not designed for solar lights and can leak or even explode.
The batteries must be positioned according to the exact orientation used by the previous batteries.
Step 8: Replace the cover and screws.
Reinstall the cover. Make sure the rubber or silicone ring around the edge hasn’t shifted. Water cannot enter because of that ring. Reinstall the screws. Make them secure by tightening them.
Step 9: Test the light.
Turn the light on. Use your hand to completely cover the solar panel. In a few seconds, the flame should flicker on. You’re done if it does.
How to Open Type B (Hidden Battery Inside the Housing)
If you have searched all possible locations to find a battery door but still cannot locate it, you should not feel anxious. Your battery is inside. Here’s how to reach it. But first, a warning.
The method requires more work. The manufacturer should be contacted first if your light is still covered by warranty. Certain lights need to remain closed because they are not designed that way. Proceed with your work carefully.
Step 1: Turn the light off.
Turn any switches to “off.” Remove the batteries from any visible battery compartment that you have already opened.
Step 2: Turn the light over and check for screws.
The solar panel housing needs examination at its interior space while the lamp base and all plastic joints should be inspected.
Screws are frequently hidden by stickers or rubber plugs.
The surface contains a hidden screw because you can feel a small bump and depression when you touch it.
Step 3: Remove all visible screws.
There may be anywhere from two to six screws. Keep them organized. Some lights have different screw lengths for different locations.
Step 4: Gently separate the housing.
The housing should be taken apart after all screws have been removed. Because of the plastic clamps, it can still feel tight. Gently separate the parts with an old credit card or a plastic pry tool. Take your time. Instead of pushing if you encounter resistance, look for any missing screws.
Step 5: Look for the battery.
The solar panel, a tiny circuit board, wiring, and the battery are all visible once inside. It’ll probably be:
- A tiny, rechargeable Li-ion battery enclosed in transparent, black, or blue plastic.
- Instead of having a plug, it might be soldered to wires.
- Attached using double-sided tape, a clip, or a tiny bit of glue.
Step 6: Note the battery’s specification.
Check the printed text on the battery you need to know like,
- the voltage (3.7V)
- the capacity (2000mAh).
Take a picture of both these things. This helps you a lot when you purchase the replacement.
Step 7: Determine if the battery is replaceable.
If it has a little plug that connects it to the circuit board you can replace the battery yourself . Simply unplug the old one and plug in the new one.
If the battery is attached straight to the wires, then you have two choices
- You can ask a friend to help you or learn how to solder.
- Bring the light to a modest shop that fixes electronics.
Or accept that the light may not be worth the effort and replace the entire fixture.
Step 8: Order a replacement.
Search online for a battery with matching voltage and similar mAh. The most effective search results will be achieved through searching with the brand and model details of the light like, “3.7V 2000 mAh Li-ion battery replacement.”
Step 9: Reassemble carefully.
A rubber gasket should be properly inserted in its groove before the housing is closed. Water can only be kept out of your light by this.
Align the housing halves and press together gently. Reinstall all screws.
Tighten until snug, not tight.
Step 10: Test the light.
Cover the solar panel and turn on the light. You’ve successfully restored your light if the flame flickers.
Conclusion:
Once you know what kind of flickering flame solar light you have, changing the battery is not difficult. You can repair a battery door with screws in five minutes. Although it takes longer and requires more attention if the battery is concealed within, it is still possible with the correct equipment and patience.
If a light only needs a new battery, don’t discard it. It was already saved from the trash can by you. And when the next battery runs out, you’ll know how to do it again.