Connecting solar panels directly to a battery can lead to the battery’s destruction in a matter of weeks. DIY solar fans have experienced thousands of dollars in losses due to this blunder. The silently acting solar charge controller, which most people ignore, is the hero that prevents this accident and even increases your harvest power by as much as 30 percent.
Consider it as the smart “thinking” part of your alternative energy system that is not connected to the grid. The expensive batteries have no backup if the controller is not present. With the proper one, you will get the greatest efficiency and lifetime from all the rays of the sun.
In this article, we will discuss how does a solar charge controller work, 3 essential jobs of every solar charge controller, which controller is best for you, and common installation mistakes that you should avoid.
A Solar Charge Controller: What Is It? The Traffic Cop in Your System
Picture a very busy intersection without traffic lights. Cars (electricity) would run into each other, gridlock would be the result, and chaos would take over. Your solar power setup is that intersection, and the charge controller is its smart traffic signal system.
Why you absolutely need one:
Battery Protection: Batteries cost 40-60% of most solar systems. They would, however, fail even earlier if no protection were provided.
Safety: It is safety that avoids overheating, the generation of gas, and the occurrence of fire hazards from overcharged batteries.
Efficiency: Ensures you harvest every possible watt from your panels.
How does a solar charge controller work? The simple answer
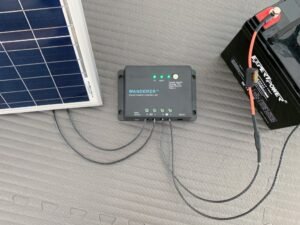
A solar charge controller is a device that regulates the voltage and protects your battery at the same time. It is installed between the solar panels and the battery to carry out the functions like preventing the battery from getting overcharged and over-discharged, and stopping reverse current drain at night.
Advantages
- Battery Protection: In the case of solar systems, 40-60% of their costs come from batteries. They will fail prematurely if there is no protection.
- Safety: Heats, gassing, and fire hazards caused by overcharged batteries are all prevented through this.
- Efficiency: It guarantees that you are collecting every last watt from your solar panels.
The 3 Essential Jobs for Every Solar Charge Controller
The three main functions are performed by every good quality solar charge controller, and they are:
- Prevent Overcharging: Charging a battery past its capacity is not safe, as heat will be generated in the battery electrolyte, gas bubbles will be produced, and eventually the internal plates will be destroyed. The controller keeps track of the battery’s voltage and will reduce the charging current or completely stop it when the battery is fully charged.
- Prevent Over-Discharging: Completely draining a battery (this is known as “deep discharge”) may cause it to die forever. Today’s controllers turn off the loads (like lights, fridge, etc.) when the battery voltage drops to a critical low level, typically around 10.5V for a 12V system.
- Block Reverse Current: At night, solar panels can actually become very small electrical loads. Without any method of protection, current would reverse from the battery to the panels, whereby the slow draining of your stored energy occurs. The controller operates as a one-way valve.
The Charging Stages: A Smart Progression
Quality controllers don’t only stop and start the charging process; they move intelligently from one stage to another:
Bulk Stage: During low battery condition, the controller begins with the current flowing from the solar panel, which is the maximum available. Just as one would open a valve completely to fill an empty tank quickly.
Absorption Stage: At approximately 80% charge of the batteries, the controller keeps the voltage constant at a certain level (generally, it’s 14.4-14.6V for 12V lead-acid batteries) and concurrently, it slowly decreases the current. This can be likened to decreasing the flow rate as the tank is almost full.
Float Stage: When batteries are fully charged, the controller cuts back the voltage to maintenance level (around 13.2-13.8V), which stops the batteries from being overcharged and at the same time allows the natural self-discharge to be countered. This is similar to adding a little water just to compensate for the evaporation.
Equalization (for lead-acid only): This is a periodic and controlled overcharge of the battery that will mix up the electrolyte and avoid stratification.
PWM vs. MPPT: Which Is Right For You?
Most guides get unclear at this point. Let’s use suitable analogies to make it clear:
How it works: Picture operating a simple garden hose tap. You fully open it, then immediately close it, turn it off and on, controlling the average flow depending on the time for which it is left open or closed.
Technically, A PWM controller reduces the voltage of the solar panel to be equal to the voltage of the battery. For example, if your battery is 12V, your panel, which can provide up to 18V, is limited to operating at 12V. The “excess” voltage is mainly dissipated as heat.
Recommended for: Small and uncomplicated systems where the main factor is cost, and the panel voltage is very similar to that of the battery.
MPPT (Maximum Power Point Tracking) – The Smart Pressure-Regulating Nozzle
How it works: Picture a smart nozzle that now recognizes water best at a certain pressure. High-pressure flow is the input, but the nozzle smartly reduces it to lower-pressure, higher-volume for container filling at the fastest rate.
Technically, an MPPT controller works around the clock finding the panel’s “sweet spot”, the precise voltage and current where it produces maximum power (the Maximum Power Point). Then, it converts the extra voltage into more charging current. This is how it becomes 30% more efficient.
Recommended for: Nearly all systems, particularly those in less-than-ideal circumstances (cloudy, cold, or low light) or if the panel voltage exceeds the battery voltage.

5 Modern Features That Matter
The modern controllers are now responsible for more than just the basic regulation. The following are the features that should be looked for:
- Bluetooth Monitoring & Mobile Applications
You will be able to monitor your system using your mobile phone. You can check the battery percentage, know the charging condition, and view the historical data without opening the electrical cabinet.
- Compatibility of Lithium Batteries
Lithium (LiFePO4) battery charging profiles are very specific. Verify that your controller has special lithium modes or settings that are totally programmable.
- Control Terminals for Load Management
The special output terminals are used by which the loads are automatically disconnected when the battery voltage goes down. They are appropriate, for example, for circuits with lights that cannot be drained completely.
- Compensation for Temperature
A battery charging voltage must be regulated according to the surrounding temperature. Built-in sensors (or remote probes) will maximize charging based on your specific conditions.
- Data Logging & Communication
Monitor system performance during days, weeks, or months. Discover trends, solve problems, and improve your configuration.
Installation Essentials: Do’s and Don’ts
Critical Safety First: Power is to always be disconnected before wiring, the right wire gauge is to be used, and proper grounding is to be ensured. Additionally, fuses or breakers should always be installed.
The Right Installation Order: The controller should first be placed in an area with good ventilation, then the terminals for the battery, panel, and load should be connected and sorted out, and finally, the device should be turned on so that the options can be selected.
Common Mistakes to Avoid: One of the most important errors to avoid is connecting the panels before the battery, also exceeding the voltage limits, placing the unit under heat, omitting the fuses, and mixing incompatible types of batteries.
Conclusion:
A solar charge controller is the key, smart guardian of your solar investment. A proper selection (PWM or MPPT) and secure installation will take proper care of your batteries, and also your system will be operating at its best. It’s a tiny but very important step to a power that is always available and efficient.